
AngularJs Tutorial: Getting Started


This tutorial will help you to create a dynamic web application using power of AngularJs.

·   What is AngularJs

AngularJs is javascript MVC framework (maintained by Google) which molds static HTML application to dynamic web application. That was a brief introduction, you can find more information on Wiki and AngularJS Site.

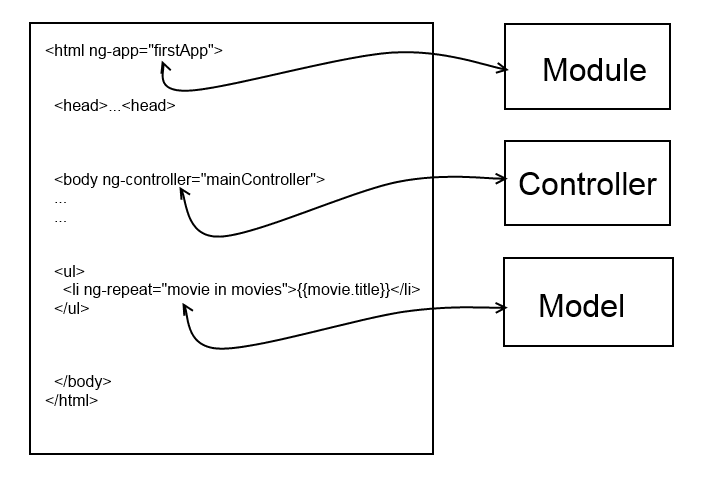
AngularJs follows MVC pattern to separate out model from view and manage it by controller. See this image
Goal of using AngularJs is to convert static HTML template to dynamic (Angular) template.


·   How to convert static template to dynamic (Angular) Template

Now consider the following static HTML template which contain list of movies title.

<html>
<head></head>
<body>
  <h1>Upcoming Movies</h1>
<ul>
    <li>
      <span>Godzilla</span>
    </li>
<li>
      <span>Batman vs Superman</span>
    </li>
<li>
      <span>Star Wars Episode VII</span>
    </li>
</ul>
</body>

</html>

Now lets convert above static HTML template into AngularJs Template by injecting Model-View-Controller by using following steps.

1.       Create AngularJS module object in javascript which will be the root scope of the AngularJs template.
2.       Using above module object create controller function which will hold the model resource (like JSON objects).
3.       Within this controller create or access model object (JSON object) using $scope variable.
4.       Now Inject module and controller Angularjs tags into view (static HTML template) and access the model object (JSON object) inside view.

Following is blueprint of steps which we are going to perform inside static template.

NOTE:
1. ng-repeat AngularJS tag is used to iterate JSON array
2.{{}} AngularJS tag is used to output content inside HTML

Now let’s create JavaScript code for AngularJs module and controller.
We will create a JavaScript file named app.js

// create module
var firstApp = angular.module("firstApp",[]);

// create controller
firstApp.controller("mainController", function($scope){

  // create model object
  $scope.movies = [{title: "Godzilla"},{title: "Batman vs Superman"},{title: "Star Wars Episode VII"}];

});

Now just include this JavaScript file and angular.js file in static HTML template
And run the application.

you will see the following result


Github Link (source code)


Comments

Subscribe for latest tutorial updates

* indicates required

Popular posts from this blog

Preload Images Using Javascript

Preload Image is technique which helps browser to render images with minimum delay. Today we will see example of image gallery. Gallery contain 5 images which load images one after another whenever user clicks next and back button. This is a basic image gallery scenario which is used in all possible website, then why we need preloaded images for this gallery? Now a day’s most of website becoming faster and user expectation is increasing. Suppose your website doesn’t use preload image technique for gallery and a user visits any image gallery from Google Plus or Facebook and visits your website gallery. Then that user always prefer those websites rather than yours. Why? Because your website load one image at a time. When user click on next button, then only gallery load image and user has wait till it get loaded. To avoid this situation gallery needs to download all images

Spring Boot RestTemplate Guide with Example

What is RestTemplet? RestTemplate is a HTTP Client library that provides basic APIs for executing different HTTP type requests. RestTemplate is one of the HTTP libraries available on the market. The Spring Boot team designed and maintains it. As previously said, it is a client library, which means it may be utilised in our application as a stand-alone dependency. To utilise it, you don't require a complete Spring boot application. It's suitable for use in simple Java applications as well as other frameworks such as Micronaut, Play and others. Setup Add RestTemplate dependency to project, for this tutorial I am creating a simple java application to consume HTTP request and a node application to provide HTTP service. For Gradle build tool Add the following dependency in the build.gradle file . // https://mvnrepository.com/artifact/org.springframework.boot/spring-boot-starter-web implementation group: 'org.springframework.boot' , name: 'spring-boot-starter-w

CSS: How To Create Custom Scrollbar For Webkit Supported Browsers

In this tutorial, we will learn how to create a custom scroll bar using custom CSS styles. Custom scrollbars are becoming increasingly popular, and I'm excited to learn more about them. A scrollbar can be customised for a variety of reasons. The default scrollbar, for example, can make an app's UI look inconsistent across various versions of windows, thus we can benefit from having a single style here. This tutorial will help to create a custom scrollbar. Let's see how One of the most interesting aspects of these scrollbars is that they may be rendered in a variety of styles for different HTML elements on the same webpage. We will see the implementation of such a scrollbar for Webkit-supported browsers. First we will look at the basic CSS properties of the scrollbar. ::-webkit-scrollbar              ::-webkit-scrollbar-thumb        ::-webkit-scrollbar-track        ::-webkit-scrollbar-button       ::-webkit-scrollbar-track-piece  ::-webkit-scrollbar-cor