
jQuery: How To Make Your Image based Website Load Faster

Hello Friends, Today I am writing my second tutorial post regarding optimization of webpage which contains bulks of images.

Let’s consider one scenario where you want to display hundreds of images at a time. And also your client wants this webpage should load faster.


Now here is the problem, webpage won’t get loaded fully unless all of its images get download first. Which means as number of images in webpage increases the load time of that webpage also increased.

To solve this problem we must reduce the webpage load time, indirectly it means that we need to load less amount of images.

Consider a scenario where we load only one default image at each place of actual images indicating that these actual images are getting downloaded and using Javascript we will download these actual images after window finishes its loading.

Following diagrams will help you to understand the flow.


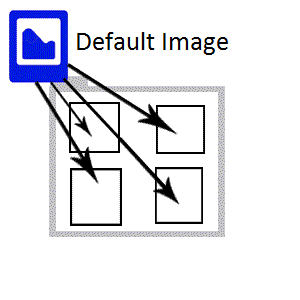
as one image wont takes too much time to load, therefore webpage speed increase and it also help to improve user experience as it tells user that all images are in the process of download.

Now we will see some code to implement this flow.
First create html page to store images.

 <body>
    <div>
 <img data-image="[actual-image-path]" src="default-loading-image-path" class="item"/>
  <img data-image="[actual-image-path]" src="default-loading-image-path"/ class="item">
  <img data-image="[actual-image-path]" src="default-loading-image-path"/ class="item">
  <img data-image="[actual-image-path]" src="default-loading-image-path"/ class="item">
</div>
  </body>

here we have created four images,where we set default loading image in source property and actual image in image data property of image tag.

Now we will add jQuery script in head section to load all actual images after page get loaded.

 <script  type="text/javascript">
 $('document').ready(function(){
             //execute after window finishes loading
    $(window).load(function(){
                   //search each image by its class name
  $('.item').each(function(index){
                          //replace current image path with actual image path
 $(this).attr('src', $(this).data('image'));
  });
});
 });
</script>

script get executed after all component get downloaded and browser is ready to render them. at that time we load all images.


Hope it will help you.

Comments

Subscribe for latest tutorial updates

* indicates required

Popular posts from this blog

Preload Images Using Javascript

Preload Image is technique which helps browser to render images with minimum delay. Today we will see example of image gallery. Gallery contain 5 images which load images one after another whenever user clicks next and back button. This is a basic image gallery scenario which is used in all possible website, then why we need preloaded images for this gallery? Now a day’s most of website becoming faster and user expectation is increasing. Suppose your website doesn’t use preload image technique for gallery and a user visits any image gallery from Google Plus or Facebook and visits your website gallery. Then that user always prefer those websites rather than yours. Why? Because your website load one image at a time. When user click on next button, then only gallery load image and user has wait till it get loaded. To avoid this situation gallery needs to download all images

Spring Boot RestTemplate Guide with Example

What is RestTemplet? RestTemplate is a HTTP Client library that provides basic APIs for executing different HTTP type requests. RestTemplate is one of the HTTP libraries available on the market. The Spring Boot team designed and maintains it. As previously said, it is a client library, which means it may be utilised in our application as a stand-alone dependency. To utilise it, you don't require a complete Spring boot application. It's suitable for use in simple Java applications as well as other frameworks such as Micronaut, Play and others. Setup Add RestTemplate dependency to project, for this tutorial I am creating a simple java application to consume HTTP request and a node application to provide HTTP service. For Gradle build tool Add the following dependency in the build.gradle file . // https://mvnrepository.com/artifact/org.springframework.boot/spring-boot-starter-web implementation group: 'org.springframework.boot' , name: 'spring-boot-starter-w

CSS: How To Create Custom Scrollbar For Webkit Supported Browsers

In this tutorial, we will learn how to create a custom scroll bar using custom CSS styles. Custom scrollbars are becoming increasingly popular, and I'm excited to learn more about them. A scrollbar can be customised for a variety of reasons. The default scrollbar, for example, can make an app's UI look inconsistent across various versions of windows, thus we can benefit from having a single style here. This tutorial will help to create a custom scrollbar. Let's see how One of the most interesting aspects of these scrollbars is that they may be rendered in a variety of styles for different HTML elements on the same webpage. We will see the implementation of such a scrollbar for Webkit-supported browsers. First we will look at the basic CSS properties of the scrollbar. ::-webkit-scrollbar              ::-webkit-scrollbar-thumb        ::-webkit-scrollbar-track        ::-webkit-scrollbar-button       ::-webkit-scrollbar-track-piece  ::-webkit-scrollbar-cor